Week 1 – Kickstart to the year

Yup, it’s a new year!

New resolutions, new rules, clean slate.

But, I’m not making any resolutions this year other than to try be better at being me than I was last year – and this will filter into everything I do… my blogging game can be upped a little bit, I definitely want to keep improving in my running, I want to get great at kickboxing. These are all things I have already laid the ground work for in past years, so this year is just focusing on making them better 🙂

And to start off I decided to try out some healthy cooking (and used JPEG & Roomie as my guinea pigs for the first meal 😉 )

I LOVE eggs – if I could eat eggs every day for the rest of my life, I would die a happy person… but sometimes it gets a bit boring to have them scrambled, or boiled or fried. So one day I was looking online for some inspiration on ways to eat eggs – but specifically EASY ways to do this as we all know how lazy I am 😛

I came across soooo many ideas, but for my first one (yes, there will be more of these posts to follow!) I chose to do roast bell peppers / capsicum stuffed with egg.

There were dozens of different recipes online and some of them so complicated and difficult so I ended up just putting my own ingredients and directions together.

img_9934

Roast capsicum stuffed with egg

Ingredients

  • Eggs
  • Bell peppers / capsicum
  • Mushrooms
  • Onion
  • Cheese
  • Olive oil
  • Salt & Pepper (to taste)
img_9924

Starting to prepare

img_9925

Chopping things up

Directions

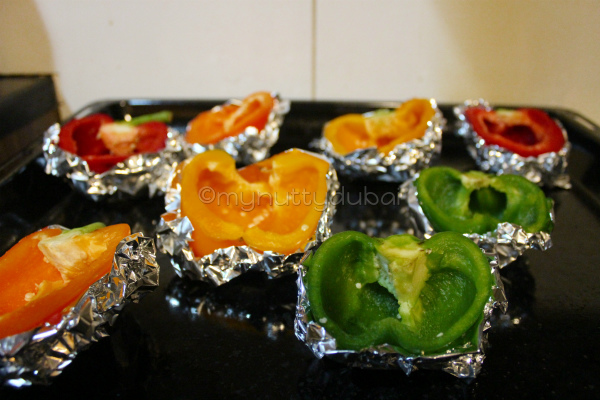
  1. Set the oven to about 180° C while you clean, halve the peppers and remove the seeds
  2. Place them in tin foil (makes it easier to remove from the tray / catch any spillage of egg) and place onto a baking tray, sprinkle with olive oil, then pop into the oven for about 10 minutes
  3. While the peppers are doing their thing in the oven, saut̩ the mushrooms & onions Рpersonally I added some herb & thai spices, and a touch of garlic
  4. Remove the peppers from the oven and spoon the mushroom & onion mix into them, making sure to leave enough space for the eggs
  5. Crack an egg into each half
  6. Sprinkle some cheese over the top
  7. Pop back in the oven for about 15 minutes – depending on how well done you want your egg
  8. Remove from the oven
  9. ENJOY!
img_9930

Frying things up

Now, this is obviously a recipe that you can mix and match the ingredients for days…. I chose these as a simple start, being a first time and all – I didn’t want to risk another failed attempt at cooking for my housemates! o_O

img_9931

Final preparation

And the outcome – absolutely delicious! The girls loved them!

img_9933

YUM!!!!

I made sure to make extra so that I could bring them to work the next day, and so for lunch I heated them up and added some turkey ham with them. Yum!


Easy, healthy egg muffins

I’ve made these a few times now and always thought that I’d posted about it – but when searching my blog the other day to give someone the recipe I realised that I actually hadn’t. So, it was the perfect excuse to make them again 🙂

It was so long ago that I don’t even have the recipe that I followed to link back to in order to give that person the credit that they deserve… sorry!

I spruced up my latest version of these that I have just made, and they are the ones that I’m going to share with you today… not just egg muffins, but bacon & egg muffins. YUM! And this idea was courtesy of a friend who posted a photo on Facebook, so, thanks for that!

The muffins are super easy to make – grab whatever ingredients you want to, chop up where necessary, crack open the eggs into a bowl, add the ingredients, whisk together, pour into a muffin pan, and bake at 200ºC for approximately 15 minutes. And Viola! Egg Muffins!

Fresh ingredients - onion, peppers, tomato

Fresh ingredients – onion, peppers, tomato

I normally use 6 eggs for 6 muffins, but the eggs I had just bought were a bit small so I had 3 large eggs and 4 small ones for 6 muffins.

For this particular version, I took a piece of bacon and wrapped it around the inside of the muffin pan, then poured the eggy-goodness in, then added a little blob of mozzarella cheese into each muffin and popped that into the oven!

Bacon bases

Bacon bases

Ready for the oven, with the mozzarella cheese thrown in

Ready for the oven, with the mozzarella cheese thrown in

The delicious-ness that is...

The delicious-ness that is…

YUM!

YUM!

Covering them to protect them from the cats while they cool down

Covering them to protect them from the cats while they cool down

Some alternate ingredient options could be mushrooms, sweet corn, bacon bits (instead of wrapping around the base), sun-dried tomato, probably fishy-things for those that way inclined… the list is endless!

Have fun, and enjoy 🙂

Quinoa, mushroom and sweet potato salad

I got the inspiration to make this salad one afternoon when I was looking at a menu for something or the other and I saw a Quinoa, avo and sweet potato salad. However, I did not have any ripe avocado at home when I wanted to make the salad so I mixed things up a bit and made my own version of the salad.

Ingredients:

  • Quinoa (1 cup)
  • Sweet potato (1 large)
  • Capsicum (I used red and green)
  • Onion (1 small)
  • Mushrooms (half punnet)
  • Olive oil (enough to coat potato)
  • Herbs (to taste)
  • Cayenne pepper (to taste)

The salad on the menu mentioned nuts so feel free to mix things up and add in / take out ingredients as you wish 🙂

How I did it

Quinoa – I followed the directions on the box… boiled water, added in the quinoa, reduced heat to a simmer and let cook for 20 minutes.

Cooking Quinoa


Sweet potato – while the quinoa was getting done, I peeled the sweet potato, chopped it into small cubes, poured the oil, herbs and cayenne pepper into a bowl and then mixed the sweet potato cubes around in the oil until they were all covered in goodness. I then placed them onto a baking sheet and put in the oven (pre-heated to 200°C) and let them do their thing. At approximately 10 minutes I turned them all over, and then after the next 10 minutes I put the grill on for a few minutes to make them brown a bit and go a bit crispy on the outside 🙂

Coating the potato


Cooking the potato


Once the quinoa was done cooking, I let it stand for a few minutes as directed by the box.

During this time I fried up my mushrooms, onions and capsicum.

Veggies


By the time all the different bits and pieces were done, I poured everything into a large bowl, gave it a good mix, dished up a bowl and proceeded to gobble away!

Although a very easy meal, it is fairly lengthy to make and requires a bit of back and forth between the foods to get them all done at the same time, but boy oh boy was it yummy!!!!! And oh so very good for you 🙂

Finished result 🙂